
You're currently in Business Support. For help with a consumer service, visit our
Using video analytics
View and manage your cameras
Learn how to use your TELUS Secure Business system
Follow the instructions below or watch a series of videos to learn how you can optimize your security system.
The will help you to better understand how to complete the following:
videos in this series
• Setting up smart video alerts
• Viewing and managing video
• Setting up video motion detection
• Managing recording rules and notifications
• Managing users
• Managing a monitored doorbell
Configure indoor/outdoor camera settings with Smart Video Alerts
You can create Smart Video Alerts with Video Object Detection rules by drawing virtual tripwires and fenced-in zones to identify when people, animals or cars are on your business premises. By setting up these rules, your camera will continuously scan your property and notify you of activity that's most important to you.
To create Smart Video Alerts, watch the videos or follow the steps below.
1.
Secure Business web portal
2.
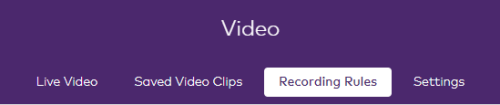
Video
from the menu on the left-hand side
3.
Recording Rules
from the list of menu option
4.
Add New Rule
on the mobile app or Add Rule
in the SmartHome web portal
5.
Video Object Detection
6.
7.
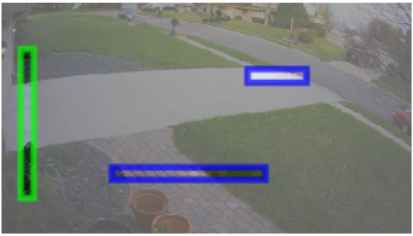
Ground Zone rules
are used to identify when objects are expected to linger in an area on your property (i.e. when visitors are waiting at your front door)
- Tripwire rules
are used to identify when objects cross a virtual tripwire (i.e. when a car pulls up on the driveway)

8.
Scenery
and Minimum Object Detection Size

9.
10.
Pro-tip for Ground Zone rule users
: If you have walls or ceilings in the camera's field of view, draw the rule from scratch by selecting the Clear Ground Zone
button located below the drawing box and then draw your rule.
11.

12.

13.

14.
15.
Save
Frequently asked questions
I have a camera setup with Video Motion Detection, how can I create Smart Video Alerts?
Before you can setup Smart Video Alerts, you have to delete your existing Video Motion Detection rules by following these steps:
- Log in to yourSecure Business web portal
- Select theVideocategory in the menu on the left-hand side
- From the top navigation bar, selectRecording Rules
- Select the delete icon on each of the Video Motion Detection recording rules associated with the camera you want setup with Smart Video Alerts
- Follow the steps listed in theConfigure indoor/outdoor camera settings with Smart Video Alerts section

I am getting notified about motion outside of my Ground Zone rule. How can I fix that?
- Log in to the customer web portal
- SelectVideofrom the left-hand column
- SelectRecording Rulesfrom the top of the page
- Select the Video Object Detection rule that you would like to modify
- SelectClear Ground Zone
- One by one, draw each point until you've drawn in the entire ground/floor surface that you would like the camera to monitor
Setting up Video Motion Detection (VMD)
You can use video motion detection, however we recommend using Smart Video Alerts instead.
- Log in to yourSecure Business web portal
- SelectVideofrom the menu on the left-hand side
- From the top navigation bar, selectSettings
- Scroll down. Select theVideo Motion Detectionsetting
- From the top bar, select the video device(s) for which you would like to set up a VMD
- Use your cursor to draw a VMD window on the video. You can draw up to 6 VMD windows per camera
Note
: Make sure you are drawing a skinny rectangle for your VMD window near the entrance of your home. Do not draw these windows over high-traffic areas such as sidewalks, streets or next door.Pro-tips
:- Once you have drawn the VMD, you can also change the sensitivity of the VMD if you find you are getting too many videos
- Make sure to draw a VMD window for each video device that you want to trigger motion-detected recordings
- Save

Set up and manage your doorbell camera recording rules
You can manage videos from your doorbell camera all through your Secure Business mobile app.
Manage your doorbell camera
:- Log in to your Secure Business mobile app
- Open the menu at the top left corner of the app
- Scroll down and selectDoorbell camera
- SelectSettingsin the top right-hand corner to pull up the options for your doorbell. Here, you can:
- Rename your doorbell
- Set up doorbell call notifications
- Set up doorbell motion detection
- Set up recording schedules
- Set up motion sensitivity
- Change LED colors
- Change chime settings and volume
To troubleshoot the doorbell camera, visit our .
support pages
View live video and manage your video clips
View live videos
:You can always view the live video of any cameras you have installed at your business location.
- Log in to your Secure Business mobile app
- Open the menu at the top left corner of the app
- Scroll down and selectVideo
- Select the video device you want to view. Select the play button
- To record a clip of your live video, select the button on the top right-hand corner of the video feed. A video recording confirmation message will show up momentarily
View saved videos
:Any recorded videos will show up in the
Saved videos
section of your app.Note
: If you have reached your limit of video uploads for the month, you will not be able to record more videos. For more details, visit our troubleshooting page
- Log in to your Secure Business mobile app
- Open the menu at the top left corner of the app
- Scroll down and selectVideo
- From the top navigation bar, selectSaved
- Scroll down and select the saved video clip you want to view
- Open up the filter menu in the top right-hand corner to filter by camera, time of recording or trigger to sort the videos you want to view
- Select the play button on the video(s) you want to view
Manage saved videos
:Once you have videos saved to your account, you can choose to:
- Protect the clip(s): Whether you have a happy moment you want to keep, or footage of a break-in you want to save for your local police in the future, you can protect clips from being overwritten on your account
- Delete clips: Since you have limited space on your account, you can always choose to delete unwanted clips to free up more space for new video clips
Note
: Deleted video clips cannot be recovered.- Log in to your Secure Business mobile app
- Open the menu at the top left corner of the app
- Scroll down and selectVideo
- From the top navigation bar, selectSaved
- Scroll down and select the saved video clip(s) you want to protect or delete
- On the top right-hand corner, select the lock icon to protect these clips
- On the top right-hand corner, select the garbage icon to delete these clips
Manage your recording rules
- Log in to yourSecure Business web portal
- SelectVideofrom the menu on the left-hand side
- From the top navigation bar, selectRecording rules
- To pause a recording rule, toggle the switch to pause or resume the rule
- To edit an existing rule, select the pencil icon
- To delete an existing rule, select the garbage icon
Did this article solve your problem?
Yes
No
Related articles
Answers to commonly asked questions on issues related to your 24/7 Onboard micro SD card recording.
Learn how to fix potential issues with your ADC-VDB750 Doorbell Camera using these instructions.
Use an SD card in a compatible camera to record video directly from the video device continuously and securely.
If you are experiencing issues with your Outdoor Camera, check the following LED reference guide to help you troubleshoot.
Learn about accessibility at TELUS